
Installing A bedroom door is A great way to improve the functionality And aesthetic appeal of your room. Regardless of whether you are installing A new door Or changing An outdated, Worn-out one, The process can initially seem challenging. “How to Install a Bedroom Door.” However, Installing A bedroom door can be a fairly simple DIY project that anyone can take on with the right equipment, Materials, And knowledge. The process for installing A bedroom door includes measuring And prepping the opening, Choosing And cutting the door to fit, Installing the hinges And door handle, And adding finishing touches. We will walk you through these processes in this post.
What Tools Do I Need To Install A Bedroom Door?
Installing a bedroom entrance requires a few basic tools to ensure that the job is done correctly. Here is A list of the tools you will need:
- Tape Measure – To measure the height And width of the door frame accurately.
- Circular Saw Or Hand Saw – To cut the gate to fit the doorcase if needed.
- Chisel – To carve out recesses in the entrance frame for the hinges And strike plate.
- Screwdriver – To attach the hinges to the door And doorcase.
- Drill – To create holes for the screws that attach the hinges And gate handle.
- Hammer – To tap the chisel And to install the strike plate.
- Level – To ensure that the entrance is hung correctly And that the hinges And handle are level.
- Pencil – To mark the location of the hinges, Strike plate, And handle.
- Wood Shims – To adjust the position of the gate in the doorcase.
- Door Knob/Handle – To open And close the entrance.
By having these tools on hand, You can ensure that you have everything you need to install A bedroom entrance properly.
Here Are Some Tricks on How To Install A Bedroom Door
Installing a bedroom door may seem like a daunting task, but by using these tricks, you can install a door like a pro. These tricks, you can install a bedroom gate quickly and easily. It’s essential to take your time and make adjustments as needed to get the perfect fit.
Step 01- Buy door for your bedroom

To ensure you make the best decision possible when buying A entrance for your bedroom, There are several considerations to keep in mind. Here are some recommendations to help you purchase A bedroom entrance that will be simple to install:
- Select the appropriate door type: Bedroom doors are available in hollow-core, Solid-core, And pre-hung designs. Although hollow-core gates are more affordable, Solid-core gates offer better insulation , And soundproofing. The simplest entrance to install are pre-hung ones because the doorcase , And hinges are already there.
- Measure the door opening: Before you start looking for A entrance, carefully measure the gate opening’s height, Width, And thickness. You will then be able to select the right gate size.
- Consider the door material:Steel, Fiberglass, And wood are just A few of the materials that can be used for bedroom entrance. Wood doors offer A classic look, while fiberglass And steel entrance are more durable And require less maintenance.
- Decide on the style And design: You can choose from A variety of designs, Including panel doors, Flush doors, And French doors.
- Examine the door swing: Make sure the gate you choose can be hung in the direction you decide the gate should swing.
Considerg these factors when buying A gate for your bedroom.
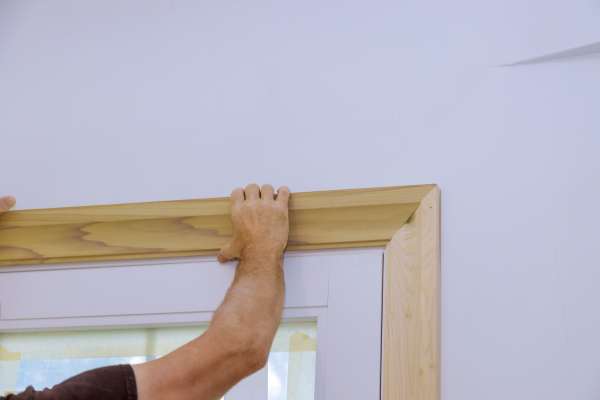
Step 02-Buildup The Door Frame

Building up the entrance doorcase is An essential step in installing A bedroom gate, As it ensures that the gate fits properly And opens And closes smoothly.
The steps of constructing the doorcase are as follows:
- Measure the doorway’s width: Measure the door opening precisely, Taking note of its height, Width, And thickness. The amount of materials needed to build the frame can be estimated using this information.
- Cut the lumber: Cut the lumber to the right length And width based on the size of the gate opening. Use a saw to make precise cuts.
- Build the frame: Start by attaching the horizontal piece of lumber to the top of the entrance opening. Use screws to secure it in place. Then, Attach the vertical pieces of lumber to the sides of the opening, Using screws to secure them as well. Make sure that the frame is level And square.
- Add shims: Wedge wood shims between the doorcase And the wall studs to ensure that the frame is level And flush with the wall. Make sure the shims are evenly spaced And adjust them as necessary until the frame is level.
- Check the fit: Place the gate in the frame to check the fit. The ntrance should fit snugly in the doorcase And open And close smoothly. If the fit is not right, Adjust the shims as necessary until the gate fits properly.
By following these steps, You can build up the gate doorcase And ensure that the gate fits properly And operates smoothly.
Step 03- Insert The Frame In The Door Gap

Inserting the frame into the entrance gap is the next step in installing a bedroom entrance after building up the entrance frame. The stages for inserting the doorcase into the door gap are as follows:
- Frame preparation: Make sure the doorcase is flush with the wall And level. Check the placement of the shims And adjust them as necessary.
- Apply caulking: Where the frame’s outer edge reaches the wall, Dab a thin bead of caulk there. This will help to seal any gaps And prevent drafts.
- Insert the frame: Carefully insert the doorcase into the entrance opening. Make sure that the shims stay in place And that the frame is level.
- Secure the frame: To fasten the doorcase to the wall studs, Use wood screws. Start with the top hinge, Go to the bottom hinge, Then finish on the latch side of the frame. Check the frame for level And adjust the shims as necessary.
- Check the fit: Place the gate into the doorcase And check the fit. The gate should open And close smoothly And fit snugly within the frame.
- Trim excess shims: Once you’re satisfied with the frame’s placement And the door’s fit, Trim any excess shims using a saw Or a utility knife. This will guarantee that the door handle And hinge installation won’t be hampered by the shims.
You can insert the doorcase into the gate gap And make sure it is firmly secured to the wall by following these instructions.
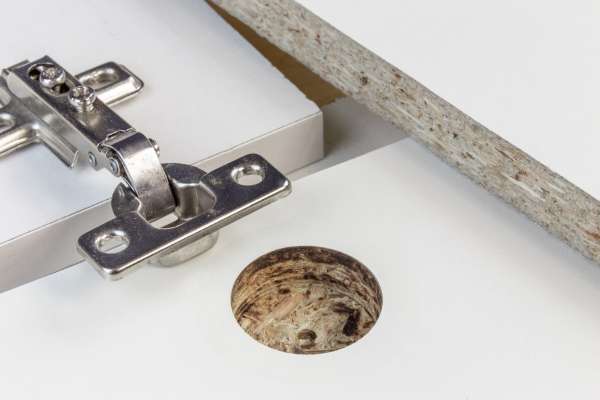
Step 04- Cut The Groove For The Door Hinge

Cutting the groove for the gate hinge is A critical step in installing A bedroom entrance as it allows the hinges to sit flush with the door And frame.
The stages of cutting the groove for the gate hinge are as follows:
- Mark the locations of the hinges: Mark the locations of the hinges on both the entrance And the doorcase before inserting the gate. Use A pencil to make the marks.
- Measure the hinge size: Measure the length And width of the hinges. This will help you determine how deep to cut the groove.
- Set up the router: Use A router with A hinge template to cut the groove. Set the depth of the router to the same thickness as the hinges. Make sure that the router bit is centered over the hinge location.
- Cut the groove: Start by cutting the groove on the gate. Hold the router level And use A steady motion to cut the groove. Repeat the process for the doorcase. In order for the hinges to sit flush, The grooves must be deep enough.
- Test the fit: Test the fit of the hinges by placing them into the grooves. They should sit flush with the gate And doorcase.
By following these steps, You can cut the groove for the door hinge And ensure that the hinges sit flush with the door And frame.
Step 05- Install The Hinges
To install hinges for A bedroom door, You will need the following tools And materials:
- Hinges
- Screws
- Screwdriver
- Pencil
- Measuring tape
- Chisel
- Hammer
The steps are as follows:
- The hinge positions on the entrance And gate frame should be measured And marked first. The top And bottom hinges should be separated by about 10 inches, with the middle hinge being positioned between them. The top hinge should be about 6 inches from the top of the gate. Use A pencil to mark the spots.
- Next, position the hinges on the gate And the doorcase, lining them up with pencil marks. The hinges should be screwed to the door And frame using A screwdriver. Make sure the fasteners are secure.
- Use A chisel to mortise in the entrance And the frame where the hinges will be placed. This will allow the hinges to sit flush with the surface of the gate And doorcase.
- Once you have mortised the entrance And doorcase, test the entrance to make sure it opens And closes smoothly.
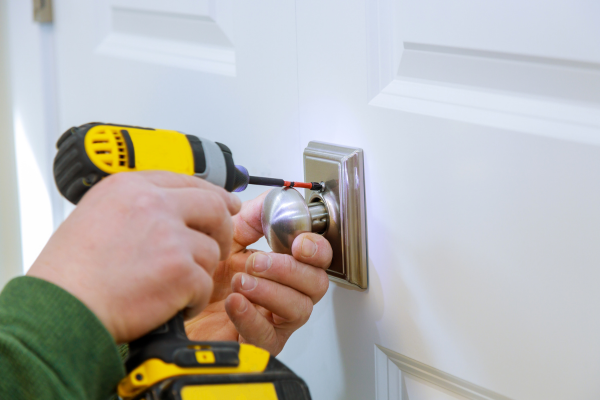
- Finally, attach the doorknob And lockset to the bedroom entrance, if necessary.
By following these steps, you should be able to install hinges for A bedroom door.
Step 06- Install The Door On The Frame
To install a bedroom entrance on its frame, Follow these steps:
Place the door into the doorcase with the hinges attached. Make sure the hinges are properly aligned with the hinge recesses on the frame.Wedge shims Or wooden blocks between the gate frame And the wall to keep the entrance in place while you adjust it.Check that the top of the door is level using a spirit level. If it’s not level, Adjust the shims until it is.
Next, To confirm that the entrance is plumb (vertical), Measure the distance between the door And doorcase at the top And bottom of each side. If the gap is unequal, Adjust the shims until the enrance is plumb. Once the gate is level And plumb, Drill pilot holes into the frame through the hinge screw holes. This will prevent the wood from cracking And make it simpler to screw in the screws.Insert screws into the pilot holes And tighten them. Make sure not to overtighten the screws, As this can cause the gate to warp.Check that the entrance opens And closes smoothly, And adjust the shims if necessary.
Finally, Remove the shims And test the entrance again to make sure it’s properly aligned And functioning correctly.
By following these steps, You should be able to install a bedroom entrance on its doorcase.
Step 07- Assemble The Handle And Install It On The Door
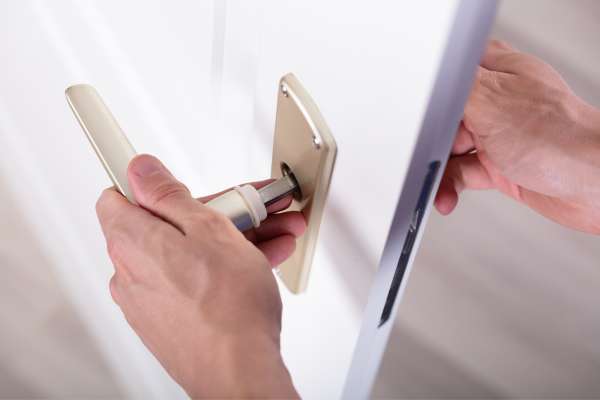
Follow these procedures to put together And install A handle on A bedroom door:
- To make sure you have all the required pieces, First check the handle’s instructions.
- Assemble the the foam and fill the all ghaps.t through the hole in the edge of the entrance. Align the faceplate with the hole in the door, And attach it with the screws provided. Make sure the latch bolt is properly aligned with the strike plate on the door doorcase.
- Install the strike plate on the door doorcase. Hold the strike plate against the frame in the location where the latch bolt meets the frame, And mark the position of the screws with A pencil. Then, Drill pilot holes for the screws And attach the strike plate with the screws provided.
- By putting the spindle through the latch mechanism And lining up the faceplate with the hole in the entrance, You may install the doorknob Or lever on the opposite side of the entrance. Attach the faceplate with screws provided.
- Test the handle to ensure that the latch bolt moves smoothly into the strike plate And that the door opens And closes properly.
- If the handle is loose, Tighten the screws holding the handle to the door using A screwdriver.
By following these steps, You should be able to assemble And install a handle on A bedroom entrance.
Step 08- Use The Foam And Fill The All Gaps

To use foam to fill gaps when installing a bedroom entrance, Follow these steps:
- First, Purchase A can of expanding foam from A hardware or home improvement store. Make sure the foam is suitable for use on doors And windows.
- Make sure the door install And aligned correctly before applying the foam, And check that any hardware, Like handles Or locks, Has attached.
- Remove any protective coverings Or tape from the areas where you will be applying the foam.
- Shake the can of foam well before using it. Then, Attach the spray nozzle And test it on a small area to make sure the foam is coming out evenly.
- Apply the foam to any gaps Or spaces around the door frame, Making sure to fill the gaps completely. Use a steady, Even motion And avoid overfilling the gaps.
- Follow the manufacturer’s recommendations And let the foam thoroughly dry And cure after application. This typically takes several hours.
- Use a sharp knife to cut off any extra foam that has extended past the gaps once the foam has fully set. Be careful not to damage the door Or frame.
- Finally, Sand any rough spots Or uneven areas around the door frame to create a smooth, Even finish.
By following these steps, You should be able to use foam to fill gaps when installing a bedroom door.
Step 09- Install The Extension Plates
Extension plates can use to extend the length of a latch Or deadbolt to fit a thicker gate. Here’s how to install extension plates on a bedroom door:
- Remove the existing latch Or deadbolt from the gate if it already installed.
- Measure the thickness of the gate to determine the length of the extension plate needed.
- Attach the extension plates to the latch Or deadbolt by aligning them with the screw holes And attaching them with screws provided.
- Making ensuring that the extension plates are flat with the door surface, insert the latch Or lock into the door’s edge hole.
- Align the faceplate with the hole in the door And attach it with screws provided. Make sure the latch Or deadbolt is properly align with the strike plate on the gate frame.
- Install the strike plate on the gate . Hold the strike plate against the frame in the location where the latch Or deadbolt meets the frame, And mark the position of the screws with a pencil. Then, drill pilot holes for the screws And attach the strike plate with screws provided.
- Test the latch Or deadbolt to ensure that it moves smoothly into the strike plate And that the gate opens And closes properly.
- If the screws holding the latch Or lock to the gate are loose, tighten them with a screwdriver.
By following these steps, you should be able to install extension plates on Soundproof a bedroom door to accommodate a thicker door.
Step 10- Install The Door Stops

Door stops are essential for preventing A bedroom gate from hitting the wall Or damaging nearby furniture. To put gate stops on A bedroom door, Follow these instructions:
- By sticking A piece of masking tape to the wall where the gate would hit if it were to swing too far open, You can determine where the door stops should go.
- Hold the gate stop in position against the baseboard Or wall, And mark the screw holes with a pencil.
- Drill pilot holes for the screws in the marked locations.
- Attach the door stop to the baseboard Or wall with the screws provided, Making sure that the gate stop is flush against the wall.
- If required, Repeat the procedure on the other side of the entrance.
- To check that the gate stops are in the proper location And that it does not touch the wall Or furniture, Open And close the door a few times.
By following these steps, You should be able to install door stops on a bedroom door.
Step 11- Check Gap At Stops

After installing door stops on A bedroom gate, it’s important to check the gap between the gate And the stops to ensure that it is consistent And appropriate. Here’s how to check the gap at stops:
- Close the bedroom gate And inspect the gap between the entrance And the stops on both sides.
- The gap between the door And the stops should be consistent along the length of the gate. If the gap wider in some places than others, The stops may need to be adjusted.
- If the gap is too large, The entrance may not be properly aligned. You can adjust the hinges to bring the gate back into alignment.
- If the gap is too small, The entrance may be rubbing against the stops Or other parts of the doorcase. You can adjust the stops Or sand down the gate edge to create more clearance.
- Test the gate by opening And closing it A few times to ensure that it operates smoothly And that there are no obstructions or sticking points.
By following these steps, You should be able to check the gap at stops on a bedroom entrance And make any necessary adjustments to ensure proper operation.
How Do I Ensure That My Bedroom Door Is Properly Aligned And Level?
Ensuring that A bedroom entrance properly aligned And level is essential for proper operation And appearance. Here’s how you can ensure that your bedroom entrance properly aligned And level:
- Check the reveal: The reveal is the gap between the gate And the jamb on the hinge side of the gate. To check the reveal, place A piece of paper between the door And the jamb, And close the entrance. If the paper pinched Or too loose, adjust the hinges to ensure that the reveal is consistent along the length of the entrance.
- Check the swing: The gate should swing freely And not rub against the doorcase Or floor. If the gater is rubbing, check to ensure that the hinges properly aligned And that the doorcase not warped. You can adjust the hinges to move the door up Or down, in Or out, Or side to side.
- Check the level: Use A level to ensure that the top of the gate is level. If it is not level, adjust the hinges to raise Or lower the gateas needed.
- Check the plumb: Use A level to ensure that the sides of the entrance are plumb, Or vertical. If they are not plumb, adjust the hinges to move the door left Or right.
- Test the operation: After making adjustments, test the gate by opening And closing it several times to ensure that it operates smoothly And does not rub against the doorcase Or floor.
By following these steps, you should be able to ensure that your bedroom gate properly aligned And level. Remember to read the instructions carefully And double-check your work to ensure A proper installation.
Final Thought
In conclusion, Installing A bedroom gate requires careful attention to detail And A systematic approach to each step of the process. From measuring And cutting the entrance to size, To installing the hinges, Handle, And lockset, To filling gaps with foam, And installing door stops, Each step is important in ensuring that the gate properly installed, Aligned, And operates smoothly. By following the steps outlined in this guide, You should able to successfully install a bedroom door that properly aligned, Level, And functions smoothly.