
Refinishing bedroom furniture involves stripping away the old finish, Repairing any damages, Applying new paint Or stain, And adding a protective topcoat. It is A project that requires some time, Effort, And attention to detail, But the end result can be truly remarkable. Not only will you have A piece of furniture that matches your personal style And preferences, But you will also have the satisfaction of knowing that you brought new life to something that may have otherwise been discarded. You may learn how to refinish bedroom furniture in this post by following the Step-By-Step instructions. We will cover everything from preparing the furniture for refinishing to selecting the right finish And applying it properly.
What Is A Refinish?
Refinishing refers to the process of restoring Or enhancing the appearance of a surface by removing the existing finish And applying A new one. It is commonly done to furniture, Including bedroom furniture, But can also be applied to other items such as floors, Cabinets, And even automobiles. Once the surface is prepared, A new finish is applied, Which can be in the form of paint, Stain, Or A combination of products depending on the desired look And the level of protection needed. It can be used to restore the original appearance of A piece that has become worn, Faded, Or damaged over time. It can also be employed to change the color Or style of the furniture, Allowing for customization And A fresh new look. Overall, The process of refinishing involves removing the old finish, Repairing any damages, And applying A new finish to enhance the aesthetics And durability of the item being worked on.
Importance Of Refinishing For Aesthetic And Functional Purposes
Refinishing furniture holds significant importance for both aesthetic And functional purposes. You may learn how to refinish bedroom furniture in this post by following the Step-By-Step instructions. Here are some key reasons why refinishing is valuable in enhancing the overall appeal And usability of bedroom furniture:
Aesthetic Transformation: Refinishing allows you to completely transform the appearance of your bedroom furniture. It gives you the freedom to customize your furniture to match your personal taste And interior design preferences, creating a cohesive And visually pleasing bedroom space.
Restoration of Worn-Out Furniture: Over time, bedroom furniture can become worn, scratched, or faded. By removing the old finish And addressing any damages, refinishing can breathe new life into tired furniture, making it look fresh, vibrant, And inviting once again.
Cost-Effectiveness: Refinishing is often a more cost-effective option compared to purchasing new furniture. Instead of investing in brand-new pieces, refinishing allows you to revive your existing furniture at a fraction of the cost.
Preservation of Sentimental Value: Bedroom furniture often carries sentimental value, especially if it has been passed down through generations or holds special memories.
Increased Durability And Longevity: Refinishing not only enhance the appearance but also improves the functional aspects of bedroom furniture. Applying a fresh protective finish can make the surface more resistant to scratches, spills, And daily wear And tear.
Preparing For Refinishing
Preparing for refinishing is a crucial step to ensure a successful and smooth process. Here are the key steps involved in preparing for refinishing bedroom furniture:
1. Assessing The Condition Of The Furniture
Begin by thoroughly examining the furniture to determine its overall condition. Look for any damages, such as scratches, dents, or loose joints. Assess the existing finish to identify if it needs complete removal or if it can be worked with as a base for the new finish.You may learn how to refinish bedroom furniture in this post by following the Step-By-Step instructions. This assessment will help you plan the necessary repairs and refinishing steps.
2. Determining The Appropriate Refinishing Technique
Based on the condition of the furniture and the desired outcome, decide on the appropriate refinishing technique. Common techniques include stripping off the old finish, sanding, painting, staining, or a combination of these methods. Research and consider the type of wood or material of the furniture to choose the best technique that will achieve the desired result.
3. Gathering Necessary Tools And Materials
Once you have determined the refinishing technique, gather all the tools and materials required for the process. This may include paint stripper, sandpaper or sanding blocks of various grits, brushes or sprayers for applying finishes, paint or stain, protective gear , wood filler for repairs, and a suitable topcoat or sealer. Ensure you have all the necessary supplies before starting the refinishing process.
4. Creating A Suitable Workspace
Set up a dedicated workspace where you can safely and comfortably work on the furniture. Ideally, choose a well-ventilated area such as a garage, patio, or a well-ventilated room with windows. Lay down drop cloths or plastic sheets to protect the floor or work surface from any spills or drips. Ensure you have ample space to move around the furniture and set up a workbench or table to support the piece while you work.
Repairing And Restoring

Repairing And restoring any damage on the furniture is a crucial step in refinishing, As it ensures that the piece is structurally sound And aesthetically pleasing. Here are the key steps involved in repairing And restoring bedroom furniture:
1. Inspecting And Repairing Any Damages
Thoroughly inspect the furniture for any damages, such as scratches, Dents, Loose joints, Or broken parts. Identify areas that need repair And make a list. Common damages include wobbly legs, Loose Or missing hardware, Cracked wood, Or chips on the surface.
2. Filling Gaps, Cracks, And Holes
Use a suitable wood filler Or epoxy putty to fill in any gaps, Cracks, Or holes in the furniture. For the particular product you’re using, Adhere to the manufacturer’s directions.. Apply the filler using a putty knife Or a spatula, Ensuring that it is evenly distributed And fills the damaged areas completely. Allow the filler to dry according to the manufacturer’s recommendations.
3. Replacing Broken Or Missing Parts
If there are broken Or missing parts that cannot be repaired, Consider replacing them. This may involve replacing a drawer, A broken leg, Or hardware such as handles Or knobs. Look for matching replacement parts either from the original manufacturer, Antique stores, Or online sources. Ensure that the replacement parts fit properly And align with the overall design of the furniture.
4. Sanding The Repaired Areas For Uniformity
Once the repairs have been made And any fillers Or epoxy putty have dried, Sand the repaired areas to achieve a smooth And uniform surface. Use sandpaper with medium to fine grit And sand in the direction of the wood grain. This step helps to blend the repaired areas with the rest of the furniture, Ensuring a seamless finish.
Applying The New Finish
Applying the new finish is the final step in refinishing bedroom furniture And is instrumental in achieving the desired look And protection for the piece. Here are the key steps involved in applying the new finish:
1. Selecting The Desired Finish
Consider the desired aesthetic, durability, and maintenance requirements when selecting the finish for your bedroom furniture. Common options include paint, stain, varnish, lacquer, or a combination of these. Choose a finish that complements your overall design scheme and personal preferences.
2. Preparing The Chosen Finish
Follow the manufacturer’s instructions for preparing the chosen finish. This may involve stirring or shaking the product, adding thinners or additives if necessary, or filtering the finish to remove any impurities. Properly preparing the finish ensures optimal application And adherence to the furniture surface.
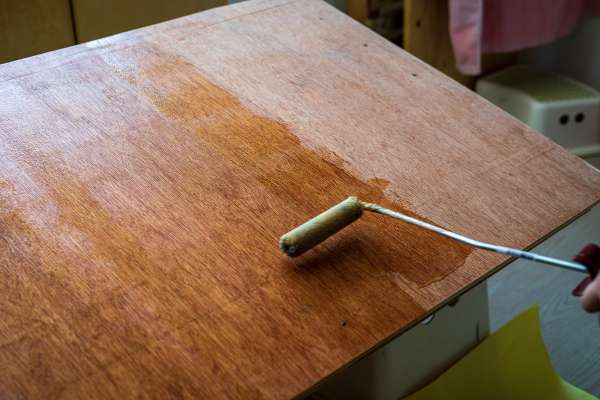
3. Applying The Finish With Appropriate Tools
Depending on the chosen finish, use the appropriate tools for application. Brushes, foam brushes, or paint sprayers can used for paint or clear finishes, while a rag, brush, or cloth commonly used for staining. Apply the finish evenly And smoothly, working in the direction of the wood grain for a seamless look. Take care to avoid drips, runs, or pooling of the finish.
4. Achieving Even And Smooth Coverage
Ensure that the finish evenly applied to all areas of the furniture, including corners, edges, And intricate details. Pay attention to achieving consistent coverage And avoiding any thick or thin spots. Work in small sections, blending the finish as you progress to maintain a uniform appearance.
5. Allowing Adequate Drying Time Between Coats
If multiple coats of finish required, allow sufficient drying time between each coat as per the manufacturer’s instructions. This is important to ensure proper curing And bonding of the finish. Sand lightly between coats with fine-grit sandpaper to promote adhesion And smoothness.
Adding Finishing Touches

Adding finishing touches to your refinished bedroom furniture helps to enhance its overall appearance And ensure its longevity. Here are the key steps involve in adding those final touches:
1. Enhancing The Furniture With Decorative Elements
Consider adding decorative elements to further enhance the aesthetics of your refinished furniture. This can include applying decorative stencils, decals, Or adding accents such as trim Or molding. These elements can painted Or stained to match the overall look of the piece.
2. Applying Sealant Or Protective Topcoat
Applying a sealant Or protective topcoat is crucial to safeguard the new finish And provide added durability. Choose a clear coat Or topcoat appropriate for your chosen finish, such as polyurethane, varnish, Or lacquer. Follow the manufacturer’s instructions for application, ensuring even coverage over the entire surface of the furniture. This step helps to protect the finish from scratches, moisture, And UV damage.
3. Buffing And Polishing The Surface For A Professional Look
After the sealant Or protective topcoat has dried, use a soft cloth Or polishing pad to gently buff the surface of the furniture. This helps to remove any minor imperfections, smooth out the finish, And achieve a professional, glossy appearance. Take care to use gentle, circular motions during the buffing process. You may learn how to refinish bedroom furniture in this post by following the Step-By-Step instructions.
4. Reattaching Hardware And Accessories
Once the finish fully cure, reattach any hardware, such as handles, knobs, Or drawer pulls, that removed during the refinishing process. Ensure they securely fastened And aligned properly. If desired, consider adding new hardware Or accessories that complement the refinished furniture And enhance its overall look. You may learn how to refinish bedroom furniture in this post by following the Step-By-Step instructions.
Cleaning Up And Final Steps

After completing the refinishing process for your bedroom furniture, there are a few important final steps to ensure a clean And organized workspace And to appreciate the results of your hard work. Here are the key steps involve:
1. Properly Disposing Of Waste Materials
Dispose of any waste materials, such as used sandpaper, old finish remnants, Or empty containers, in accordance with local regulations. Check if there are specific guidelines for disposing of chemicals Or hazardous materials used during the refinishing process. Proper disposal helps to maintain a clean And safe environment.
2. Cleaning And Organizing The Workspace
Clean up the workspace by removing any leftover dust, debris, Or spills. Vacuum Or sweep the area to ensure it is free from any particles that could potentially damage Or soil the refinished furniture. Organize your tools And materials, returning them to their designated places for future use. You may learn how to refinish bedroom furniture in this post by following the Step-By-Step instructions.
3. Evaluating The Final Result
Take a step back And evaluate the final result of your refinishing project. Assess the furniture’s appearance, noting any areas that may require additional touch-ups Or adjustments. Make sure all repairs are well-done And the finish is even And smooth. This evaluation will help you identify any potential areas for improvement And address them accordingly.
4. Admiring And Enjoying The Refinished Furniture
Finally, take the time to admire And enjoy your refinished bedroom furniture. Appreciate the transformation you’ve achieved And the effort you put into restoring And revitalizing the piece. Place the furniture back in its intended location in your bedroom And revel in the satisfaction of having a beautiful And personalized piece that adds charm And style to your living space. You may learn how to refinish bedroom furniture in this post by following the Step-By-Step instructions.
The Final Thoughts
In conclusion, refinishing bedroom furniture is a rewarding And transformative process that allows you to breathe new life into old or worn-out pieces. Beginning with assessing the condition of the furniture, determining the appropriate refinishing technique, And gathering the necessary tools And materials, you lay a solid foundation for the refinishing process. Stripping the old finish, repairing any damages, And sanding the surface contributes to a smooth And even canvas for applying the new finish. Carefully selecting the desired finish And applying it with the right tools, achieving even smooth coverage, And allowing adequate drying time between coats are crucial for a professional-looking outcome.
With patience, attention to detail, And the right techniques, you can create stunning And personalized pieces that add charm And style to your bedroom. So, unleash your creativity, embrace the refinishing process, And embark on the journey of transforming your bedroom furniture into unique And beautiful pieces that reflect your personal taste And style.